If you often use Elementor to build websites for clients, you’ve probably come to appreciate the many useful widgets that are available.
Occasionally you’ll work on a project that requires something unique, something that can’t be found in Elementor or any of the many extensions out there. Do you A.) Tell your client there’s no way to do what they’re asking, B.) Try and find an extension that will do something similar, or C.) Develop something custom that will fit the requirement?
If you find yourself in this situation, you may want to try your hand at building something custom that can easily be added via your page-builder. Luckily, it’s a fairly simple process to build an extension for Elementor.
For this example let’s run through the process of building something pretty basic: a definition list widget. Here’s what the HTML markup looks like for a definition list:
					<dl>
    <dt>instantiation</dt>
    <dd>The act or an instance of instantiating. (definition.com)</dd>
    <dt>NULL</dt>
    <dd>The special null value represents a variable with no value.  A variable is considered to be null if:  it has been assigned the constant null; it has not been set to any value yet; it has been unset(). (php.net)</dd>
    <dt>DOMDocument</dt>
    <dd>Represents an entire HTML or XML document; serves as the root of the document tree. (php.net)</dd>
</dl>
When viewed in a browser, the markup above looks like this without any additional styling.
- instantiation
- The act or an instance of instantiating. (definition.com)
- NULL
- The special null value represents a variable with no value. A variable is considered to be null if: it has been assigned the constant null; it has not been set to any value yet; it has been unset(). (php.net)
- DOMDocument
- Represents an entire HTML or XML document; serves as the root of the document tree. (php.net)
Now that we know what we’re trying to create, let’s get started!
The Basic File Structure
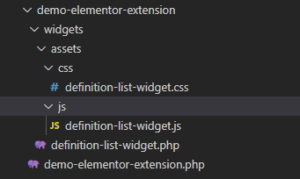
Navigate to the plugins directory in your development environment and create a new folder. Give it a title that makes it clear what the plugin does. For this article, we’re giving it a super-basic title: Demo Elementor Widget, with the folder titled ‘demo-elementor-extension’.
Inside this directory, I created files and folders as shown in the image below.
The Main Plugin File
The main plugin file is where you will set up the extension class and include methods to initialize the extension. A walkthrough of the code is available in Elementor’s documentation: https://developers.elementor.com/creating-an-extension-for-elementor/
This class defines the extension class and initializes it. It also checks for minimum Elementor and PHP requirements, pulls in the code for the definition list widget, and enqueues the extension’s css and js files.
In the method titled ‘init_widgets’ in the main extension class, there’s a require_once that pulls in the widget files. You can find it starting on line 218. Double-check it matches the location and name of your main widget file, and go on to the next step.
The Definition List Widget Code
In the main widget file, declare the class for the definition list widget. Inside of the opening tag for the class, add your constructor.
This is where you can register any stylesheets or scripts the widget needs. Elementor has its own method of enqueueing, which you’ll see further down the page. If the widget you build doesn’t require any styles or scripts, feel free to remove the code registering and later on enqueueing these files.
					/**
 * Definition List Widget Class
 *
 */

final class Definition_List_Widget extends \Elementor\Widget_Base {

    public function __construct( $data=[], $args=null ){

        parent::__construct( $data, $args );

        wp_register_style( 'definition-list-css', plugin_dir_url( __FILE__ ) . '/assets/css/demo-elementor-widget.css' );


        wp_register_script('definition-list-js',  plugin_dir_url(__FILE__) . '/assets/js/demo-elementor-widget.js', ['elementor-frontend'],'1.0.0', true );


    }


    // Rest of the widget code will go here


} // End 'Definition_List_Widget'
Widget Class Methods
The next several code blocks show all of the methods you can use for the custom widget.
  // Get widget name
  public function get_name() {

    return 'definition-list-widget';

  }
The ‘get_name’ method is where you add the slug for the widget.
					  // Get widget title
  public function get_title() {

    return __( 'Definition List Widget', 'definition-list-widget' );

  }
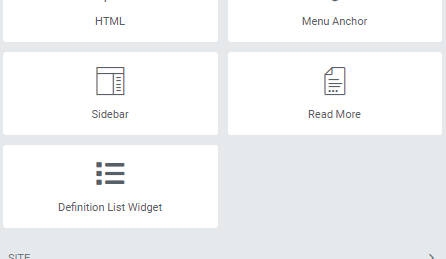
The ‘get_title’ method is where you add the widget title. This is what will display on the tile in the Widget panel of the page builder.
					  // Get icon for widget tile
  public function get_icon() {

    return 'fas fa-list';

  }
The ‘get_icon’ method is where you set the icon you want for your widget. This will display above the title in the Widgets panel. Choose which Font Awesome icon you want to use for this, and put the class names into the return statement.
For this example, I used a list icon as the widget symbol.
// Set the widget category
public function get_categories() {

    return [ 'basic' ];

}
The ‘get_categories’ method allows you to specify which category your widget displays in.
The following categories are available by default with Elementor’s free version:
basic: The Basic category
general: The General category
theme-elements: Appears in the Site category
wordpress: The WordPress category
pojo: This is listed as a category for Pojo Themes widgets. Even if you don’t have Pojo themes installed, putting your widget into this category will cause the tab for Pojo Themes to appear in the widget panel.
You can also create your own custom category. This requires you to use Elementor’s /elementor/elements/categories_registered hook.
Enqueue Stylesheets and Scripts
  public function get_script_depends() {

      return [ 'definition-list-js' ];

  }


  public function get_style_depends() {

      return [ 'definition-list-css' ];

  }
To enqueue scripts and stylesheets, use these two methods:
get_script_depends()
get_style_depends()
In each method, you return an array of CSS or JavaScript files registered in the constructor.
Widget Controls
Some widgets can be built that don’t use inputs, or controls, that allow the user to add their own content. This won’t be true of a lot of widgets, and adding controls gives the user ability to tailor the content to their needs.
You can add as many controls as you need in the register_controls() method. All of the controls have to be contained in sections, using the opening and closing statements shown below.
					protected function _register_controls() {

    $this->start_controls_section(
      'definition_list_section',
      [
          'label' => __( 'Definition List', demo-elementor-extension' ),
          'tab'   => \Elementor\Controls_Manager::TAB_CONTENT,
      ]

    );

    // Add controls code here


    $this->end_controls_section;

}
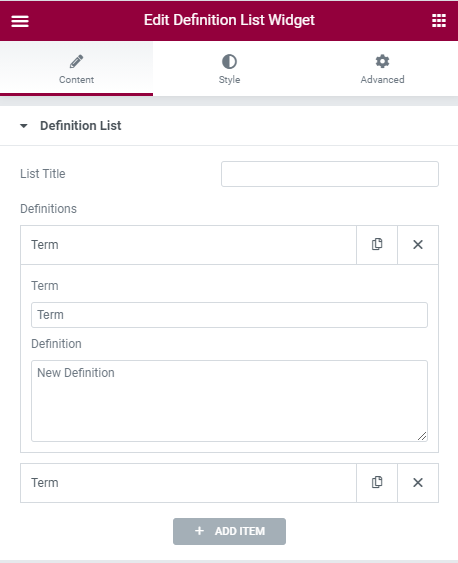
For this example, we’re going to add a text field. If the user wants to have a heading above the list, here is where they can add it.
					$this->add_control(
      'definition_list_title',
      [
        'label'     => __( 'List Title', 'definition-list-widget' ),
        'type'      => \Elementor\Controls_Manager::TEXT
      ]
      );
Since this is a list widget, it makes sense to use a repeater control to allow the user to add their list items. First we’ll create an instance of the Elementor repeater object, then use the add_control method to add inputs to it.
For a definition list, we need fields for the term and the definition. The term can be a text field, and the definition a textarea so the user can input more text as needed.
Additional controls can be added later, but for now we’ll stick with the essential ones we need for the widget to function as expected.
					    $repeater = new \Elementor\Repeater();

    $repeater->add_control(
        'repeater_term',
        [
            'label'         => __( 'Term', 'definition-list-widget' ),
            'type'          => \Elementor\Controls_Manager::TEXT,
            'default'       => __( 'Term', 'definition-list-widget' ),
            'label_block'   => true,
        ]
    );


    $repeater->add_control(
        'repeater_definition',
        [
            'label' => __( 'Definition', 'definition-list-widget' ),
            'type' => \Elementor\Controls_Manager::TEXTAREA,
            'default' => __( '', 'Demo Elementor Widget' ),
            'placeholder' => __( 'Input definition here', 'definition-list-widget' ),
        ]
    );

    $this->add_control(
        'definition_list',
        [
            'label' => __( 'Definitions', 'definition-list-widget' ),
            'type' => \Elementor\Controls_Manager::REPEATER,
            'fields' => $repeater->get_controls(),
            'default' => [
              [
                'repeater_term' => __( 'Term', 'definition-list-widget' ),
                'repeater_definition' => __( 'New Definition', 'definition-list-widget' ),
              ],
              [
                'repeater_term' => __( 'Term', 'definition-list-widget' ),
                'repeater_definition' => __( 'New Definition', 'definition-list-widget' ),
              ],
            ],
            'title_field' => '{{{ repeater_term }}}',
        ]
    );
You can also add default values for the controls if you wish, that will appear as soon as the user adds it to the page. For this example, we’re adding 2 default repeater fields, so that the list has a couple of items to start off with.
The two methods needed to set the widget’s appearance are render() and content_template(). The render() method formats the view for the front end of the site, while content_template() is used for the live preview.
So, in the render function we’ll add php code to lay out the widget view. To start, we’ll initialize a variable named $settings and save the Elementor page data to it.
Once we have the info in the variable, we use our field names to get the list title and the terms and definitions. For the info in the repeater fields, we’ll use a foreach loop to get each term and definition.
					<?php

protected function render(){

    $settings = $this->get_settings_for_display();
    $title    = $settings['definition_list_title'];
    $def_list = $settings['definition_list'];

    if( $def_list ){
      if( count($def_list) > 0 ) {
        ?><h3><?php echo $title; ?></h3>
          <dl>
        <?php
        foreach( $def_list as $def ) {
          ?><dt><?php    echo $def['repeater_term']; ?></dt>
          <dd><?php   echo $def['repeater_definition']; ?></dd>
        <?php


         } // End foreach
        ?></dl><?php
     } // End if '$def_list'
    }


   } // End function 'render'
In the content_template() method, we’ll do pretty much the same thing we did in render(), but using Underscore JS template instead of php.
					protected function content_template(){
     <#
      let title   = settings.definition_list_title;
      let deflist = settings.definition_list;


      if( deflist ){  #>
      <dl>
      <#
         _.each( deflist,function(term,definition){
          #>
          <dt><# {{term}} #></dt>
          <dd><# {{definition}} #></dd>
          <#
         });

          #>
          </dl>
          <#
         }
      #>

  } // End function 'content_template'
With all of the code needed for the widget in place, I’ll test it out by creating a new post and adding some Doctor trivia including a definition list. In this list are the twelfth Doctor’s companions and a description for each.

Everything appears to be displaying as expected.
Now that you have a basic Elementor extension, you can build on it by adding styles and other options as needed.
To learn more about widget development, check out this post on adding styles to your extension.


